A Step-by-Step Overview of the Fat Grafting Process in Riyadh
Fat Transfer Surgery in Riyadh has become a premier choice for those seeking a "natural" approach to volume restoration and body contouring. Unlike procedures that rely on foreign materials, fat grafting—also known as autologous fat transfer—utilizes your own biological tissue to enhance features and smooth out imperfections. This organic method not only ensures high bio-compatibility but also provides the added benefit of slimming down donor areas through targeted liposuction. In 2026, Riyadh's elite clinics have streamlined this process into a meticulous multi-step journey that prioritizes cell viability and patient comfort. By understanding the journey from the initial harvest to the final integration, patients can better appreciate the technical artistry and scientific rigor that define this transformative procedure.
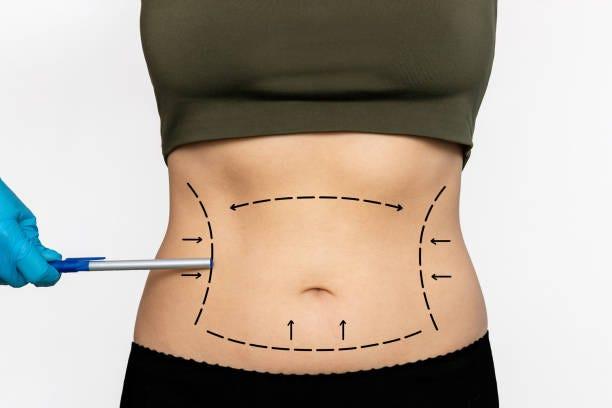
Step 1: Pre-Surgical Mapping and Anesthesia
The journey begins before the first incision is made. During a pre-surgical consultation, the specialist performs "mapping," where they mark both the donor sites (areas of excess fat) and the recipient sites (areas requiring volume). Common donor sites in Riyadh include the abdomen, flanks ("love handles"), and thighs. Once mapping is complete, anesthesia is administered. For smaller areas like facial fat grafting, local anesthesia with sedation is often sufficient. For larger procedures like a Brazilian Butt Lift (BBL) or breast augmentation, general anesthesia ensures the patient remains comfortable throughout the 2-to-4-hour session.
Step 2: The Gentle Harvest (Liposuction)
The most critical phase for long-term success is the harvesting of the fat cells. Unlike standard liposuction where the goal is simply removal, fat grafting requires a "gentle harvest" to keep the adipocytes (fat cells) alive.
-
Low-Pressure Suction: Surgeons use specialized, thin cannulas with small side-ports to manually extract the fat using low-pressure suction.
-
Manual Technique: Many top specialists in Riyadh prefer manual syringe aspiration over mechanized pumps, as the reduced physical stress on the cells significantly improves their "take rate" once they are moved to the new site.
-
Dual Benefit: This stage provides the added cosmetic benefit of body sculpting, as the donor area is permanently thinned and contoured.
Step 3: Purification and Concentration
Raw fat extracted during liposuction contains blood, oil from ruptured cells, and tumescent fluid, none of which should be reinjected. The "purification" step is where the science truly happens.
-
Centrifugation or Filtration: The harvested material is placed in a centrifuge—a machine that spins at high speeds to separate the graft into distinct layers. This isolates the pure, healthy fat "pellet" from unwanted fluids.
-
Stem Cell Preservation: Advanced systems used in 2026 are designed to preserve the Adipose-Derived Stem Cells (ASCs) found within the fat, which are essential for skin rejuvenation and graft survival. Once purified, the fat is transferred into small, precise syringes for the final stage.
Step 4: Strategic Injection and Layering
The final step is the injection of the purified fat into the recipient site. This is an artistic process that requires an expert understanding of anatomy and facial harmony.
-
The "Micro-Droplet" Technique: To ensure survival, the fat is injected in tiny droplets (aliquots) throughout the tissue. This maximizes the surface area of the graft, ensuring every fat cell has access to oxygen and nutrients from the surrounding blood vessels.
-
Multi-Layering: The surgeon layers the fat at different depths—from deep near the bone to superficial just under the skin—to create a smooth, three-dimensional result that looks natural from every angle.
-
Over-Correction: Because the body naturally absorbs 20% to 40% of the fat in the first few weeks, the specialist may slightly "over-fill" the area to ensure the final, settled result meets the patient's goals.
Step 5: The Integration and Recovery Phase
After the procedure, the recovery process begins at both the donor and recipient sites. In the first 48 hours, patients may experience moderate swelling and bruising.
-
The "Take" Period: For the first few weeks, the newly transferred fat is "settling." It is vital during this time to avoid putting pressure on the area (e.g., using a BBL pillow or avoiding sleeping on the face) to allow new blood vessels to grow into the graft.
-
Final Results: While the initial volume is visible immediately, the "true" result is typically seen between 3 and 6 months. By this time, the surviving fat cells have become a permanent, living part of your body, responding naturally to your weight and aging process for years to come.